Reverse Engineering Process

From the Source Code to an Executable and Back
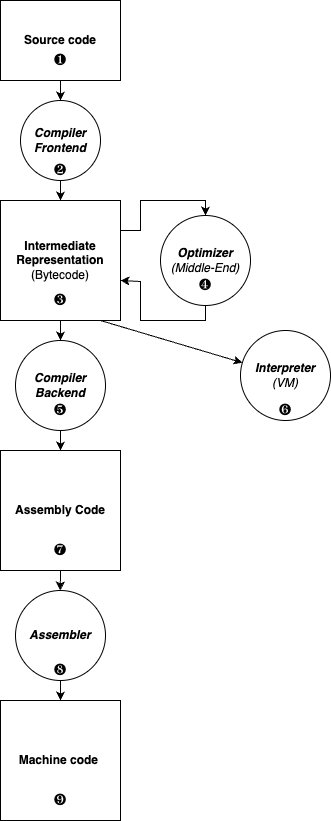
The following figure illustrates the different generic stages of software and the tools used to move from one stage to another.

Starting from any source code (C, C++, Rust, Java, Python, etc.) in ❶, the first stage of a compiler ❷, called the frontend, is responsible to produce an intermediate representation (IR) ❸, also called bytecode. At this stage, this bytecode can be transformed, for example by an optimizer ❹, whose goal will be to make it fast or small (or both).
Bytecode can be executed by an interpreter ❻, also called a virtual machine. Examples are the Java Virtual Machine (JVM), or CPython. The advantage is that the bytecode is independent of the target machine, and you only need to install a native interpreter to run it. A disadvantage is that interpreting bytecode is not very efficient.
An intermediate representation or bytecode can also be further transformed: it is converted to assembly language ❼ by the compiler backend ❺, before being translated by an assembler ❽ to produce machine code ❾ in the form of object code, a native executable file or a dynamic library.
This process occurs either at the software build stage (static compilation), in which case a final executable is shipped to the end user, or in a dynamic manner using Just-in-Time (JIT) compilation techniques, in which case, the bytecode is transformed on the target platform (such as an Android mobile phone), and the JIT mechanism translates it into native code just prior to execution. Typical real-world examples of JIT usage include the Android Runtime (ART), Microsoft Common Language Runtime (CLR), and Chrome V8 JavaScript/Wasm engine.
A Concrete Illustration
Let's look at this simple C code:
#include <stdio.h>
#include <stdlib.h>

int main (void)
{
  int i, sum = 0;

  for (i = 1; i <= 63; i++) {
    sum += i;
  }
  fprintf (stdout, "The sum of 1 to 63 is %d.\n", sum);

  return EXIT_SUCCESS;
}
The compiler’s frontend (here, LLVM’s clang) creates an intermediate representation (IR):
; ModuleID = 'exec_build.c'
target datalayout = "e-m:o-i64:64-f80:128-n8:16:32:64-S128"
target triple = "x86_64-apple-macosx10.11.0"
; [...]
; Function Attrs: nounwind ssp uwtable
define i32 @main() #0 {
  %1 = alloca i32, align 4
  %i = alloca i32, align 4
  %sum = alloca i32, align 4
  store i32 0, i32* %1
  store i32 0, i32* %sum, align 4
  store i32 1, i32* %i, align 4
  br label %2
; [...]
  ret i32 0
}

declare i32 @fprintf(%struct.__sFILE*, i8*, ...) #1
; [...]
The IR is then changed into assembly code by the compiler’s backend:
.section	__TEXT,__text,regular,pure_instructions
	.globl	_main
	.align	4, 0x90
_main:                                  ## @main
	.cfi_startproc
## BB#0:
	pushq	%rbp
Ltmp2:
	.cfi_def_cfa_offset 16
Ltmp3:
	.cfi_offset %rbp, -16
	movq	%rsp, %rbp
Ltmp4:
	.cfi_def_cfa_register %rbp
	subq	$16, %rsp
	movl	$0, -4(%rbp)
	movl	$0, -12(%rbp)
	movl	$1, -8(%rbp)
LBB0_1:                                 ## =>This Inner Loop Header: Depth=1
	cmpl	$63, -8(%rbp)
	jg	LBB0_4
## BB#2:                                ##   in Loop: Header=BB0_1 Depth=1
	movl	-8(%rbp), %eax
## [...]
	retq
## [...]
The assembler code is then converted to machine code (or native code), which are raw bytes (shown here in hexadecimal) that can run directly on the target architecture (here, Intel x86-64):
cf  fa  ed  fe  07  00  00  01  03  00  00  80  02  00  00  00
10  00  00  00  60  05  00  00  85  00  20  00  00  00  00  00
19  00  00  00  48  00  00  00  5f  5f  50  41  47  45  5a  45
52  4f  00  00  00  00  00  00  00  00  00  00  00  00  00  00
00  00  00  00  01  00  00  00  00  00  00  00  00  00  00  00
00  00  00  00  00  00  00  00  00  00  00  00  00  00  00  00
00  00  00  00  00  00  00  00  19  00  00  00  28  02  00  00
5f  5f  54  45  58  54  00  00  00  00  00  00  00  00  00  00
00  00  00  00  01  00  00  00  00  10  00  00  00  00  00  00
00  00  00  00  00  00  00  00  00  10  00  00  00  00  00  00
07  00  00  00  05  00  00  00  06  00  00  00  00  00  00  00
5f  5f  74  65  78  74  00  00  00  00  00  00  00  00  00  00
5f  5f  54  45  58  54  00  00  00  00  00  00  00  00  00  00
f0  0e  00  00  01  00  00  00  70  00  00  00  00  00  00  00
f0  0e  00  00  04  00  00  00  00  00  00  00  00  00  00  00
00  04  00  80  00  00  00  00  00  00  00  00  00  00  00  00
5f  5f  73  74  75  62  73  00  00  00  00  00  00  00  00  00
5f  5f  54  45  58  54  00  00  00  00  00  00  00  00  00  00
60  0f  00  00  01  00  00  00  06  00  00  00  00  00  00  00
[...]
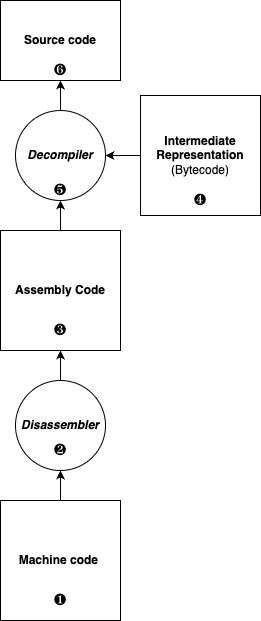
The picture below illustrates the different software reverse engineering stages. The software reverse engineering process typically begins with some native machine code ❶. However, this process can also be performed on bytecode ❹, for applications written in Java, Kotlin, Python, C#, applications targeting WebAssembly, or even source code such as JavaScript ❻.

Starting from the previous machine code, you can use a disassembler ❷ (here, otool -tV on macOS) to recover the assembly code ❸:
exec_build:
_main:
0000000100000ef0	pushq	%rbp
0000000100000ef1	movq	%rsp, %rbp
0000000100000ef4	subq	$0x10, %rsp
0000000100000ef8	movl	$0x0, -0x4(%rbp)
0000000100000eff	movl	$0x0, -0xc(%rbp)
0000000100000f06	movl	$0x1, -0x8(%rbp)
0000000100000f0d	cmpl	$0x3f, -0x8(%rbp)
0000000100000f14	jg	0x100000f35
0000000100000f1a	movl	-0x8(%rbp), %eax
0000000100000f1d	movl	-0xc(%rbp), %ecx
0000000100000f20	addl	%eax, %ecx
0000000100000f22	movl	%ecx, -0xc(%rbp)
0000000100000f25	movl	-0x8(%rbp), %eax
0000000100000f28	addl	$0x1, %eax
0000000100000f2d	movl	%eax, -0x8(%rbp)
0000000100000f30	jmp	0x100000f0d
0000000100000f35	leaq	0x46(%rip), %rsi        ## literal pool for: "The sum of 1 to 63 is %d.\n"
0000000100000f3c	movq	0xcd(%rip), %rax        ## literal pool symbol address: ___stdoutp
0000000100000f43	movq	(%rax), %rdi
0000000100000f46	movl	-0xc(%rbp), %edx
0000000100000f49	movb	$0x0, %al
0000000100000f4b	callq	0x100000f60             ## symbol stub for: _fprintf
[...]
0000000100000f5f	retq
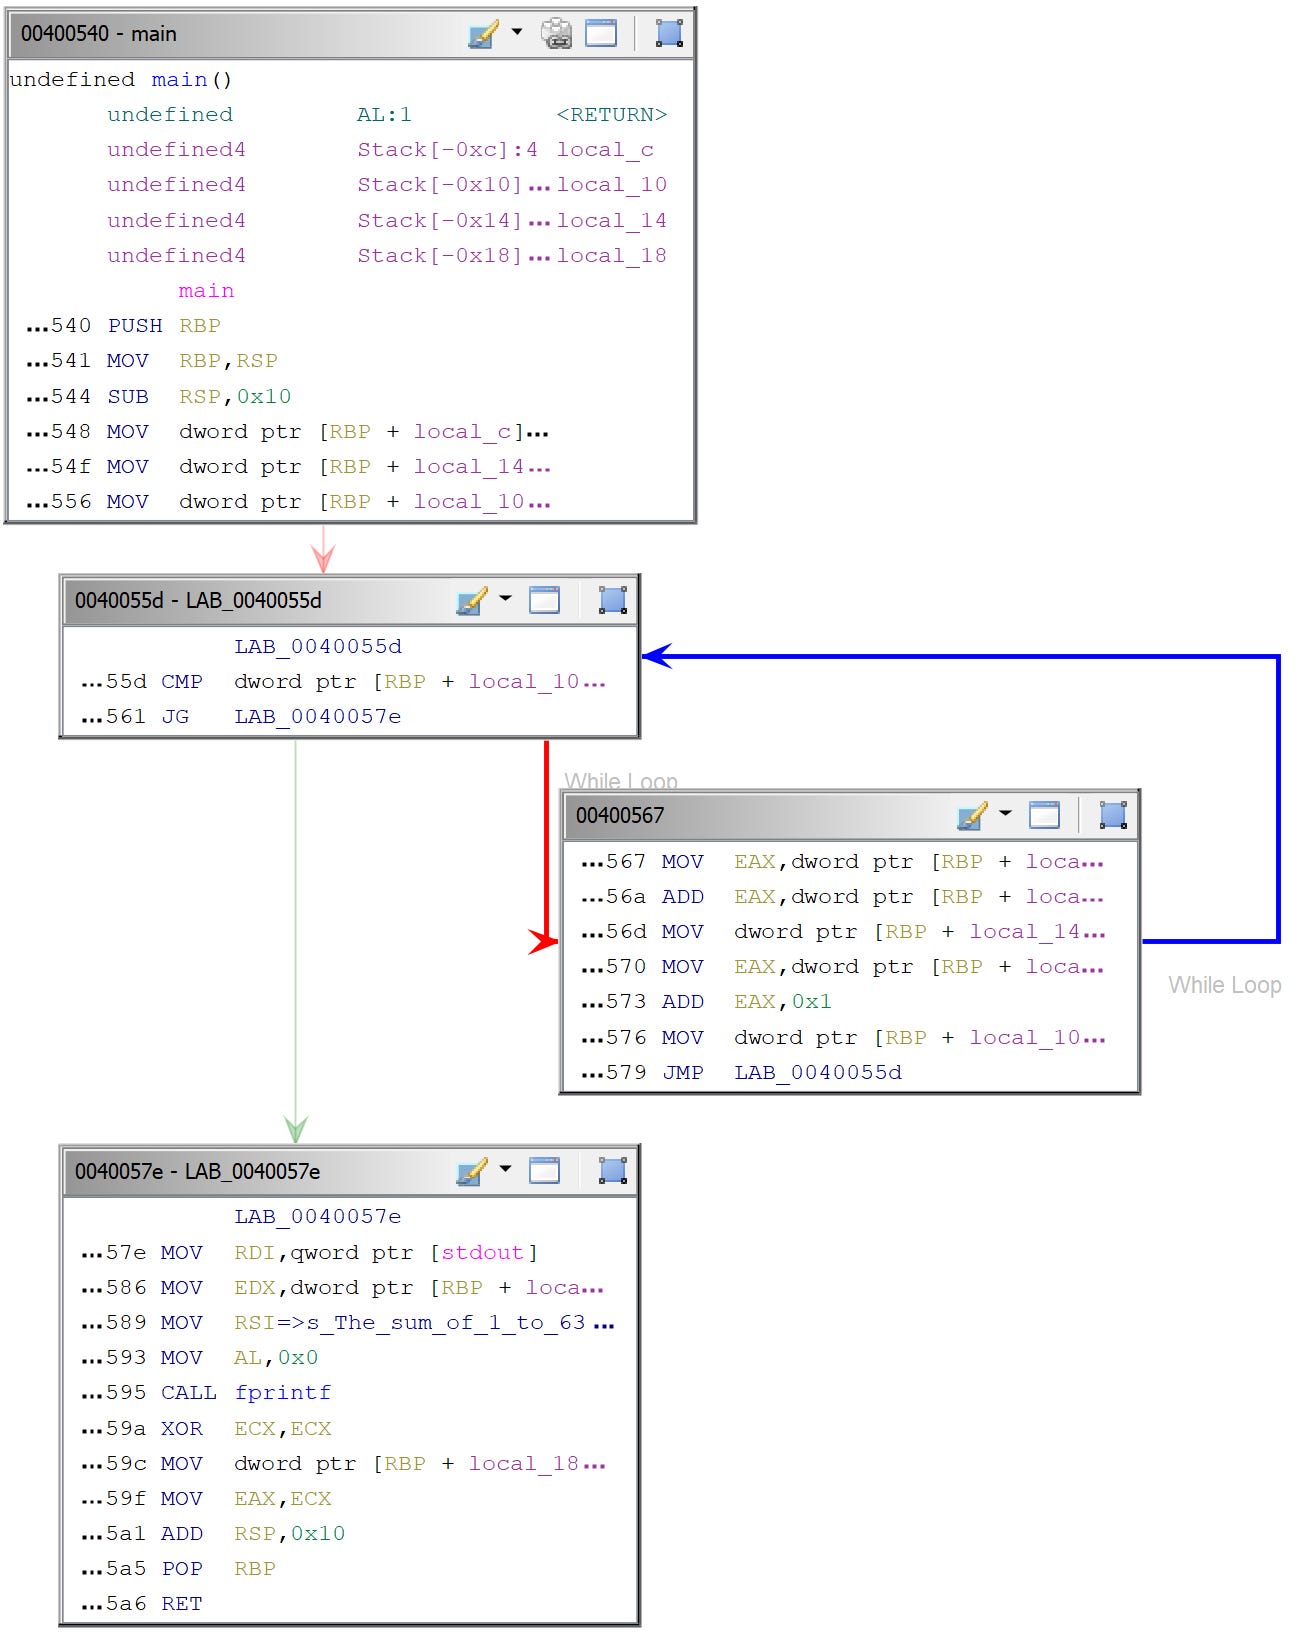
A more advanced disassembler (here, Ghidra) provides a better overview of the disassembled code:

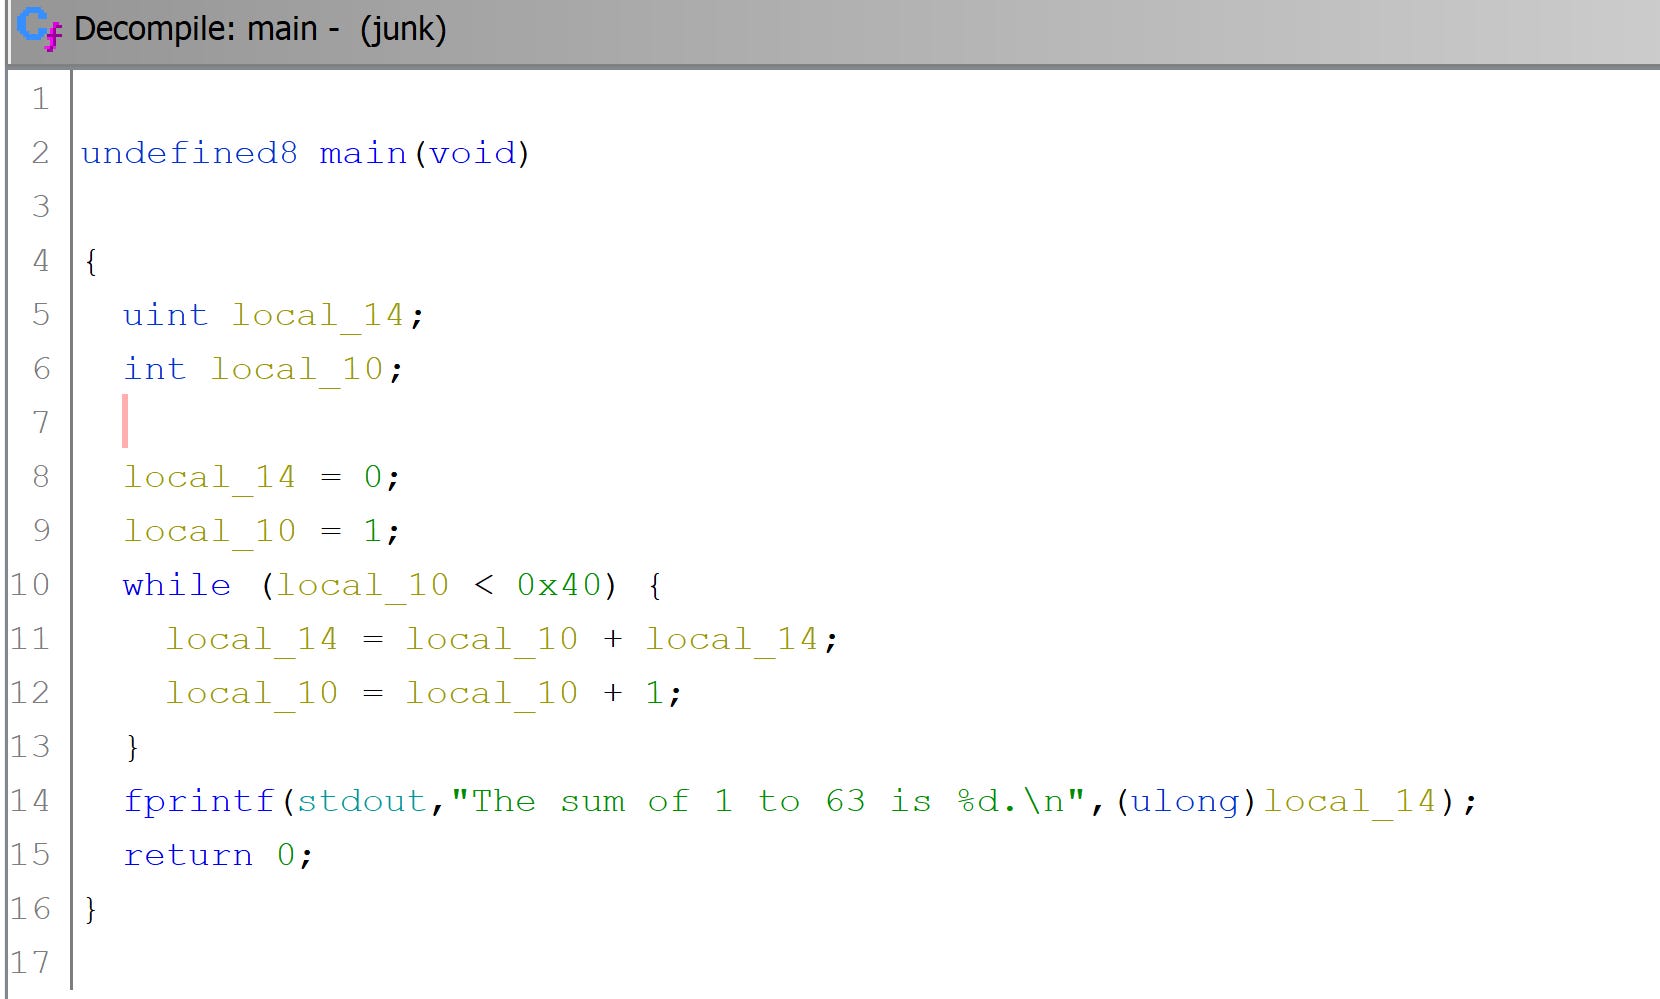
A decompiler ❺ (here, a new time Ghidra) can often show a readable version in C:

Various Types of Analysis
Static analysis is everything that can be done without running the binary, like getting a partial disassembly, a list of constant strings, a list of dynamic library imports/exports, etc. However, some information cannot be obtained by static analysis alone, such as when the processor is told to jump to an address that is dynamically calculated.
Dynamic analysis uses additional information provided at runtime, such as the contents of memory and registers, the list and results of interactions with the operating system, and so on.
Disassembly is a 4-stage process:
- Find the right place to start. This can be difficult when data and code are mixed or for machine code targeting embedded systems.
- Decode an opcode (or instruction machine code), which is a complex operation for opcodes of different lengths or opcodes that can have optional prefixes on some hardware architectures.
- Print the opcode.
- Identify the next opcode.
Linear sweep disassembly is the simplest way to proceed; this technique is mainly used by tools like gdb, objdump, otool, etc. The main idea is that one instruction ends where another begins.
The control flow isn’t understood, so branches, loops, etc. aren’t recognized. Linear sweep provides a complete coverage of a binary code section, but it doesn’t take into account the fact that data and code can be mixed together (for example, in switch statements, jump tables, or virtual functions).
Recursive disassembly is all about control flow. It decides if an instruction should be disassembled or not based on whether it is referenced by another instruction. Roughly, it implements the following strategy:
- Sequential flow: pass execution to the instruction right after it;
- Conditional branches: disassemble both possible paths;
- Unconditional branches: try to determine the next instruction;
- Function calls: they are similar to unconditional instructions, but with a return instruction;
- Return instructions: they give no information about what instruction will be executed next, as the return address is fetched on the stack or in a register on most architectures.
The ability of recursive disassembly to distinguish code from data is superior, but indirect code paths are still not understood.
In addition to disassembly, decompilation does:
- a semantic analysis to recover data types, like
long longoru128; - a data flow analysis to remove lower-level aspects such asregisters, condition codes, and stack references;
- a control flow analysis to recover control structures (loops,conditional branches, switch structures, etc.);
- a type analysis to recover high-level data types, such as arrays,structures, and classes.
In the next episode, I will list several tools that are useful for performing software reverse engineering. Stay tuned!
Thanks for reading Crumbs of Cybersecurity! Subscribe for free to receive new posts.
